Showing posts with label Penny's quilt. Show all posts

Wednesday, July 7, 2010

Jack and the Tulip


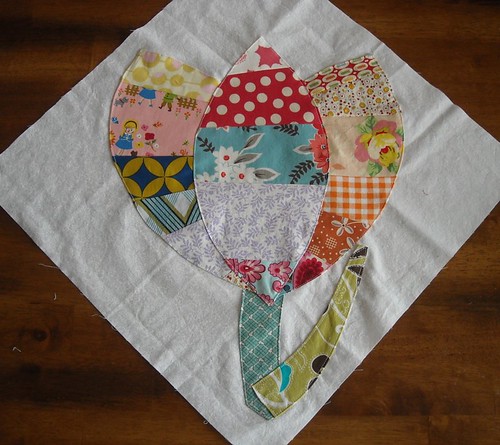
I originally thought about naming this last, but hopefully not least! I have had a crazy 6 weeks, but luckily things are slowing down now. I could not bear to cut up Jack so he has become the centrepiece of the tulip. I hope you like it Penny!

Saturday, June 12, 2010

A tulip for Penny.

This is what I get for being so smug last month about keeping up.
Penny, I'm sorry I'm so behind this month! This guys is on his way.
I hope you will love your flower - it was a pleasure to make it.
Another quilt I can't wait to see.

Sunday, June 6, 2010

Penny's Block

Tulips are my absolute favorite flower! It's a shame they don't last longer. I was so excited when Penny first showed this block on her blog and happy to have the chance to make a block for her in the bee.

Penny's Block

I think the center section is my favorite part of the flower. It looks a lot like popsicle colors to me, which is perfect for these hot summer days.

Penny's Block

Sorry it's so late, Penny! June appeared out of nowhere around here. It's going in the mail first thing tomorrow.

Friday, June 4, 2010

tulip time.

I had a great time putting this tulip together for Penny. I love this style of piecing, thanks ladies for turning me on to it! Between the long weekend, travel and thunderstorms I had to wait until the sun was bright enough for a photo shoot. Thanks for your patience, Penny!

I'm certain this quilt will be a show-stopper when it's all put together. All of the blocks I've seen so far have been gorgeous! Thanks for sending such pretty fabrics to play with Penny! I'll get this in the mail today or tomorrow :)

Thursday, June 3, 2010

penny's flower

penny i finished your flower!
and i didn't burn any fingers in the process!!

this block is not something i'd usually make...
so thanks for making me try something new!


{your block is on its way to you.. with the fabric for my month!}

Wednesday, June 2, 2010

Block For Penny

I pooped myself the entire time I was working on this block. It was not a pretty sight.

I knew I could do this, but I was scared. Scared that I'd make a mess of it. Scared that I'd read the instructions wrongly and end up with something completely horrific. Just plain ol' scared.

But I have to say... It wasn't half as scary as I thought it'd be. I'm not saying it came out perfectly (Penny, I'm sorry it looks like it was sewn by a 5-year-old)... far from it. But it started to get fun by the middle, and by the end, greatly satisfying.


After finishing the block, it dawned upon me that I didn't mind the machine applique. The part I didn't like was turning the edges in 1/4 inch. That was sooooooo tedious. And I always think I'm going to iron my fingers or cook my fingers with the steam gushing out. I like to complain, don't I?

I added a couple of my own fabrics because I stupidly chopped up most of the scraps, not realising that I'd need much longer strips than I thought.

Penny, I hope you like it and I'm so sorry for the delay!

-- Audrie

Tuesday, May 25, 2010

My Flower for Penny

I kind of procrastinated this. Then I started it without remembering the directions. Then I looked at them and continued doing it "right."

I like how it turned out. Edge stitching the applique down was a good feeling for some reason.

I like the little piece of Happy Camper fabric I got. Are we supposed to send scraps back?

Friday, May 21, 2010

Happiness is a Bloomin' Flower


I didn't want to do it.
The block.

Then when I did,
I didn't want to sew it down by machine.
Especially with white thread.
(I didn't even HAVE white thread)

And then?

I fell in love with it.
It's a great block.
And I, for one, can't wait to see all the blocks together
in a quilt top!!!

Again, here I go down this same path - now, I want to make my own 
big old bloomin' blocks!!

Thanks Penny for broadening my horizons.


natalie.

Wednesday, May 12, 2010

A happy tulip

I finished up Penny's pretty flower and sent it on its way already! Just noticed you can see my ironing board under the white.


Glad I got it done quickly, my machine just threw a fit and is skipping stitches horribly. I had to take it to the 'Sewing Doctor' as Becket said. Hope it's back soon!

Good thing I've started making hexagons, huh?

Tuesday, May 11, 2010

A Tulip for Penny

Ok, so I just received Penny's package yesterday, and well... all I can say is it must be the florist in me, because I couldn't wait to make this pretty flower :) I used some of my own fabric, and yes the seam ripper made one appearance... note: take the background fabric to a well lit area to be sure you have the correct side before sewing, oops. Hope you like it Penny!

Tuesday, May 4, 2010

If only May would have come 7 or so days later......

But it didn't.
And now I'm busy finishing up the final touches to get everyone's fabrics in the mail by Thursday. Thanks everyone for being so patient with me!


Ok, so here it is:


May's block is the gargantuan tulip. I got the idea from the Material Obsession Two book.


I will be sending everyone:

  • an 18 inch square white background fabric

  • two side petal pattern pieces

  • one middle petal pattern piece

  • scraps for the petals (these will be all colors BUT green)
  • green scraps for the stem and leaf

Please do not use any green scraps in the petals, but only on the stem and leaf. Feel free to use some of your own scraps if you like, but if you don't, that's fine too!

You can arrange your tulip on the block however you like.

Please keep any leftover scraps that you would like.

Please sign your tulip on the leaf instead of sending siggy blocks.

This block is MACHINE applique'd, not hand. Yay!!


Here's a how-to for this block:


These are the paper pattern pieces I will be sending to everyone. The seam allowance is already included in each pattern piece.


Sewing the fabrics right to the paper, using a similar technique to this or this, cut and arrange your fabrics to your liking onto the paper pieces. The fabrics don't have to be straight strings, feel free to get creative with it! *tip, make sure you sew the fabric to the opposite sides of the two end petals so they will fit on either side of the center petal.


Trim excess fabric around the paper pattern:


Next, free-form your stem and leaf however you like and turn under the edges about 1/4 inch and press.

**edited to add (and thanks Angela for bringing this up :), please do not use interfacing for any of the pieces. And seriously, don't feel like your edges need to be perfect. Mine are far from perfect, but I think this imperfectness will add to the charm of the overall quilt**


Remove the paper backing from the petal pieces, following the instructions in the tutorial(s), and then turn under about 1/4 inch and press both edges of the center petal. For the two side petals, you only need to turn under and press the outside edges and the top (since the inside edge will be tucked under the center petal).

Arrange your pieces to your liking on the block:


Then remove the center petal and pin down the stem and two side petals. Using a straight MACHINE stitch and white thread, machine stitch the stem down first (close to the edge), then the two side petals down.


Now place the center petal and leaf back down, pin, and straight edge-stitch them in place.


Yay! You're done!

(sorry about the lengthy instructions!)

thanks again everyone for your patience with me!